ZenGuard × Salesforce AgentForce Integration Guide
Equip your Salesforce agents with real-time security and compliance checks powered by ZenGuard — all without leaving their familiar AgentForce workspace.
This tutorial walks you through every step of the integration, from credential setup to Flow Builder logic, so your AI-driven interactions stay safe and on-policy.
Prerequisites
| Requirement | Notes |
|---|---|
| Salesforce edition | Enterprise Edition or higher with AgentForce enabled |
| Permissions | System Administrator rights (to create credentials & flows) |
| ZenGuard account | API key with detect endpoint access |
| Skill level | Comfortable with Salesforce Setup and Flow Builder |
Tip
If you’ve never used Named Credentials and External Credentials before, scan Salesforce Help’s
“Named And External Credentials” article first.
Overview of the Architecture
- Agent submits a message (or an AI assistant proposes one).
- Autolaunched Flow triggers and posts the text to ZenGuard Detect API via a Named Credential HTTP Callout.
- ZenGuard returns a JSON payload (e.g. indicating whether PII or policy violations are present), plus a sanitized version of the text.
- The Flow makes a decision based on
is_detected. You might:- Block the reply and show a toast with the sanitized text.
- Auto-replace sensitive content.
- Log an incident for trust & safety review.
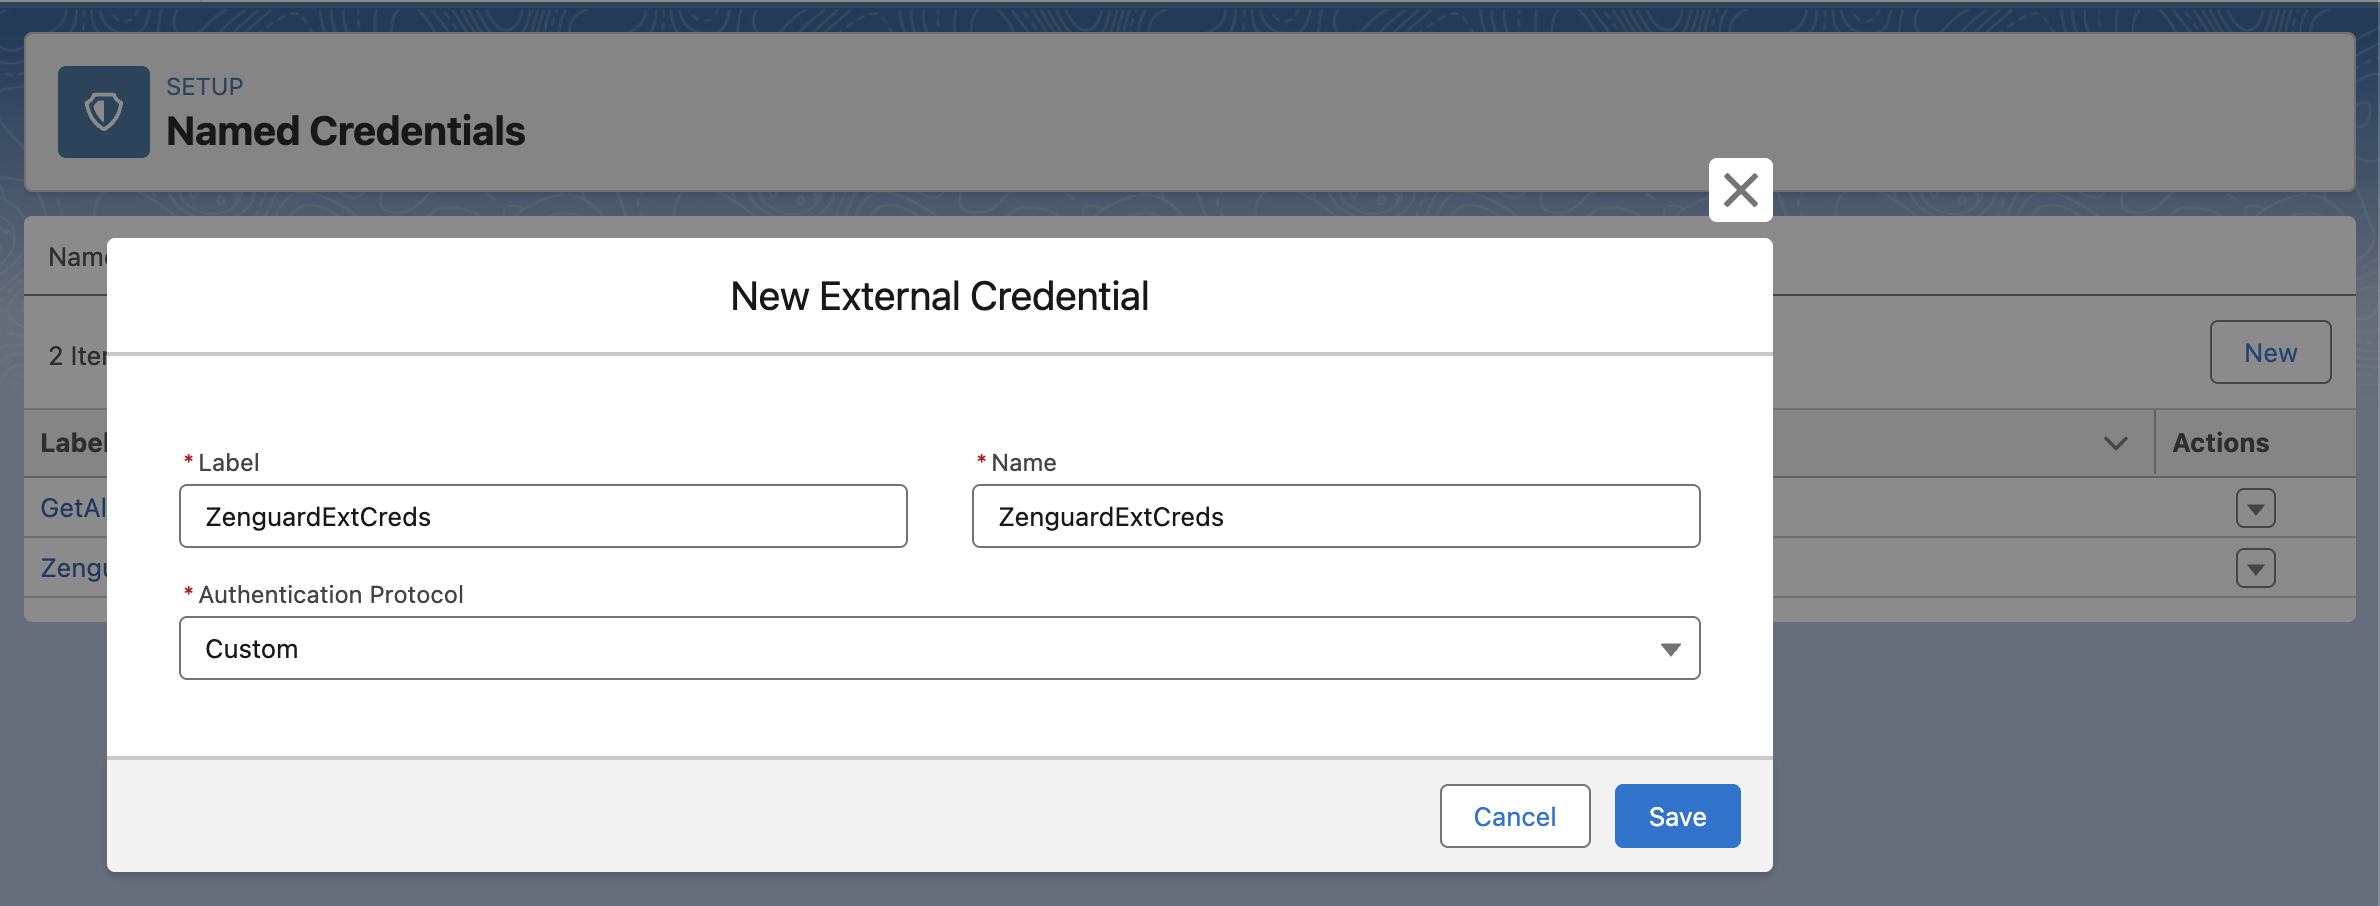
Step 1: Create External Credential and Named Credential
To begin integrating Zenguard with Salesforce Agentforce, you must create both an External Credential and a Named Credential. These will allow Salesforce to authenticate and securely call Zenguard's API.
Create External Credential Steps
-
In Salesforce Setup, go to:
Security > Named Credentials -
Click New External Credential.
-
Fill in the required fields:
- Label:
ZenguardExtCreds - Name:
ZenguardExtCreds - Authentication Protocol:
Custom
- Label:
-
Click Save.
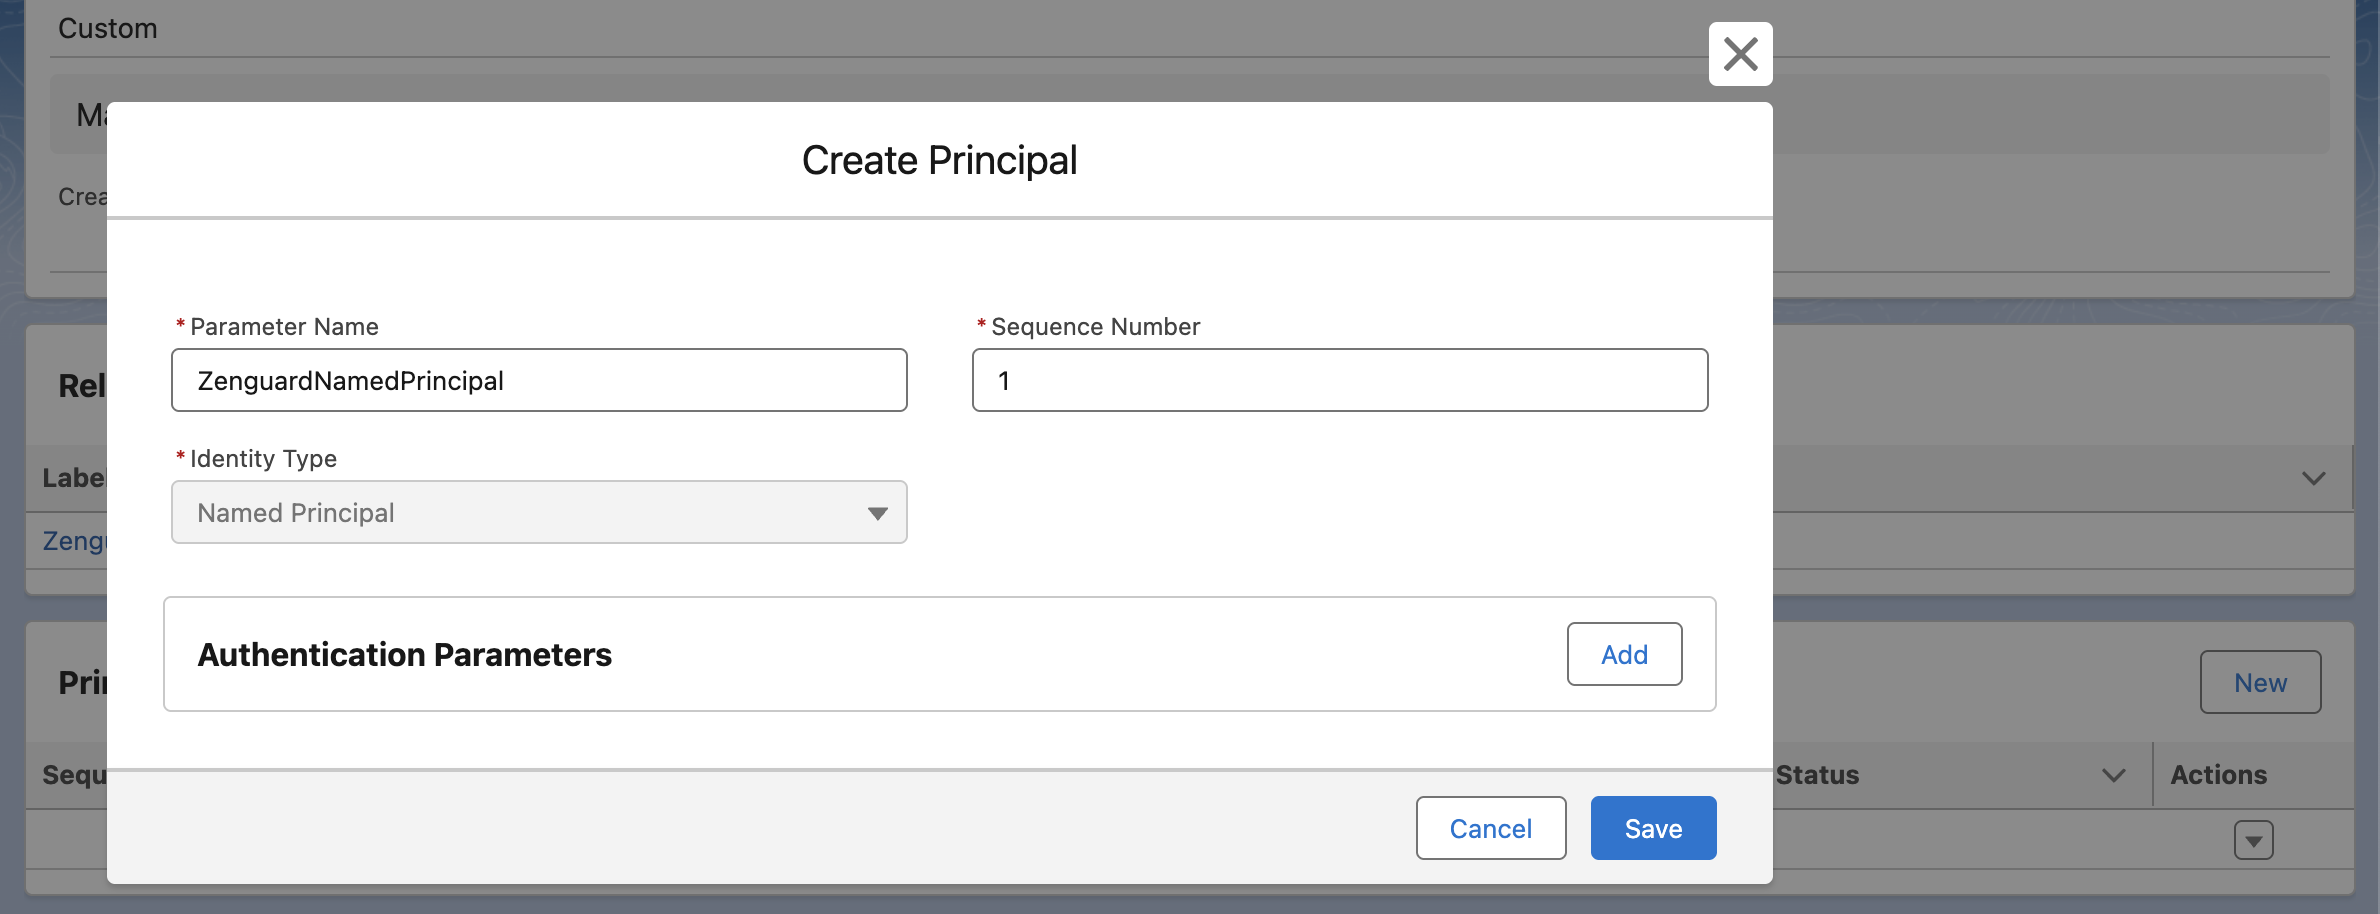
-
After saving, open the newly created External Credential.
-
In the Principals related list, click New to add a Named Principal:
- Label:
ZenguardNamedPrincipal
- Label:
-
Click Save to create the principal.
Create Named Credential Steps
-
After creating the External Credential, go back to:
Security > Named Credentials -
Click New Named Credential.
-
Fill in the required fields:
- Label:
ZenguardAPI - Name:
ZenguardAPI - URL:
https://api.zenguard.ai/v1/detect - External Credential: Select the
ZenguardExtCredscreated above
- Label:
-
Save the Named Credential.
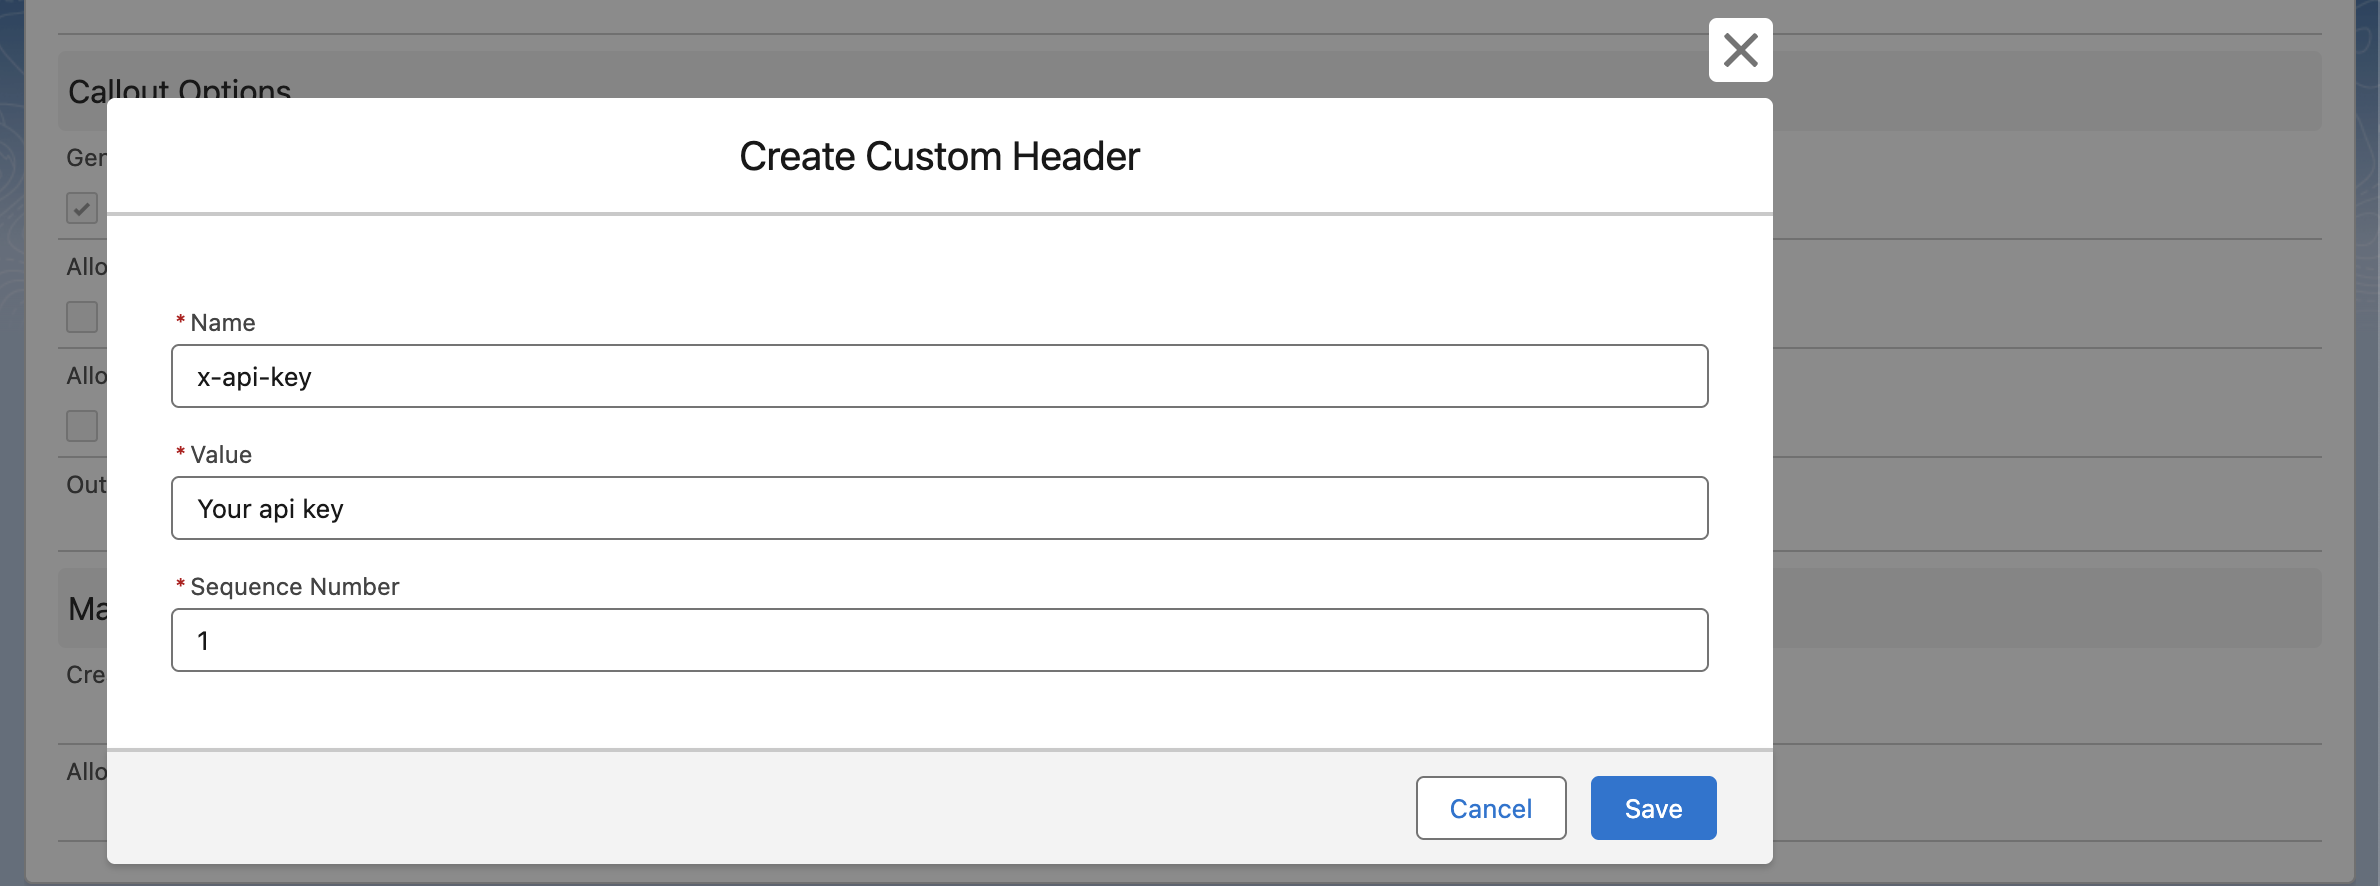
-
After saving, reopen the created Named Credential.
-
In the Custom Headers section, click New and add the following:
- Name:
x-api-key - Value: Enter your API key from the ZenGuard
- Name:
-
Save the Named Credential again.
Step 2: Enable Access to Named Principal in User Profiles
After creating the Named Principal, you need to enable access to it for the relevant user profiles (e.g., your profile and the Agentforce user profiles) by updating their profile settings.
Grant Access Steps
-
In Salesforce Setup, navigate to:
Users > Users -
Find yourself and click on our profile (for example, System Administrator).
-
Click Enabled External Credential Principal Access.

-
Click Edit, add the Named Principal you created earlier (e.g.,
ZenguardNamedPrincipal). -
Save the profile.
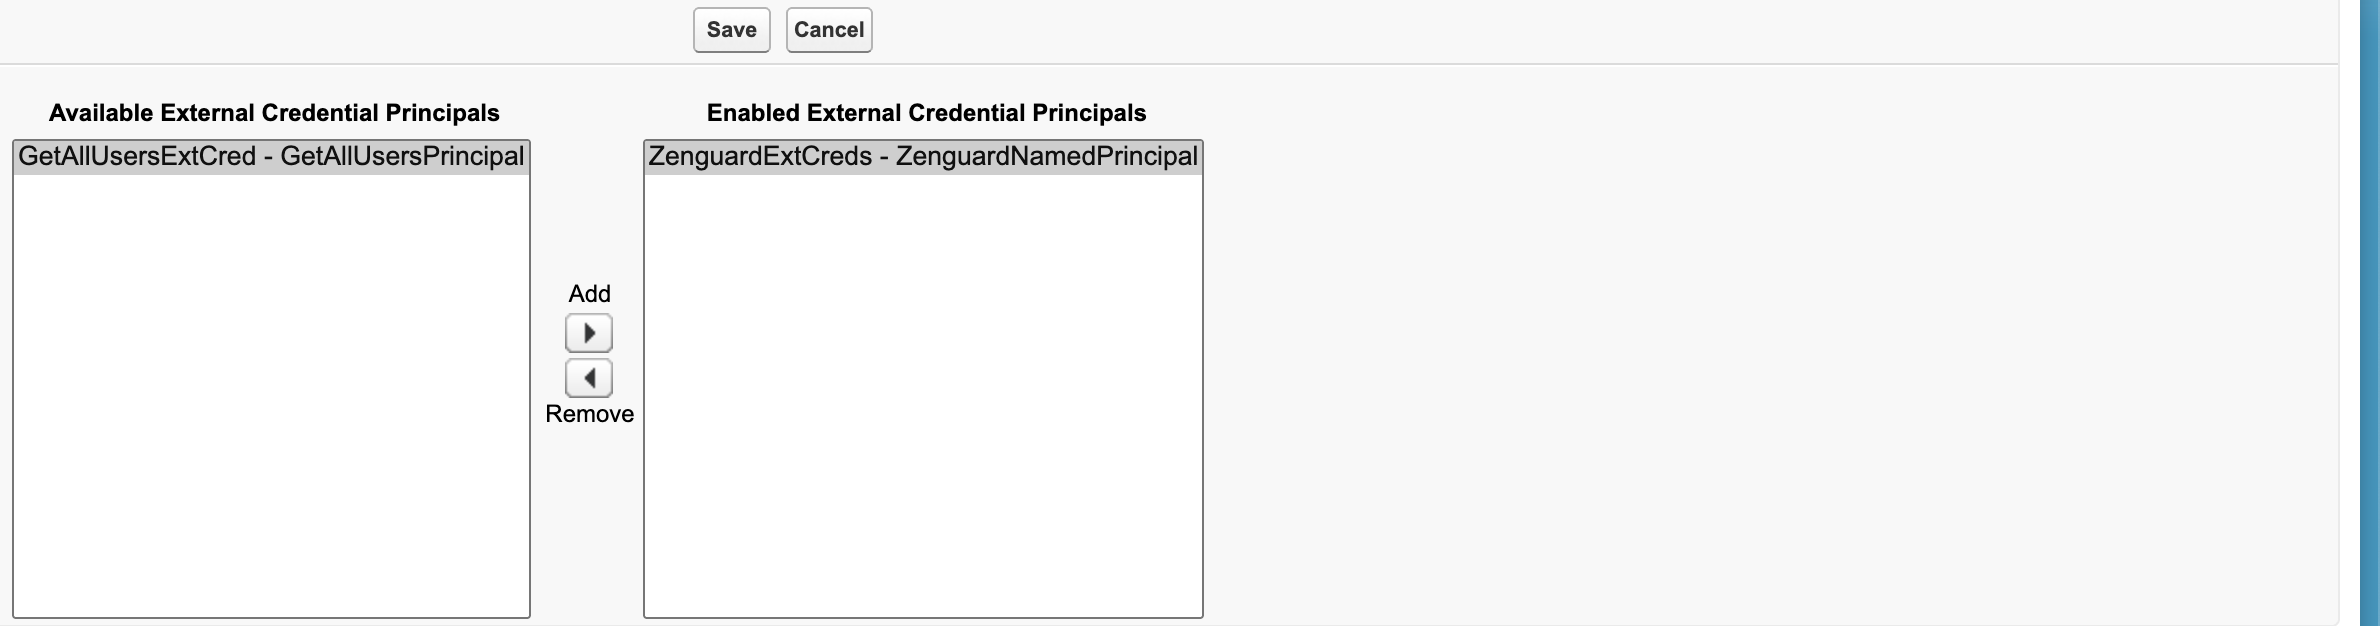
Repeat this process for all profiles that require access to the Named Principal, including the Agentforce user profiles.
Note:
Make sure that the Agentforce user profile has access to User External Credentials enabled. Without this, the integration will not have the necessary permissions to authenticate properly.

Step 3: Use an Existing Flow or Create a New Autolaunched Flow
You need to either modify an existing Flow or create a new one to build logic with ZenGuard.
Setup Flow Steps
-
In Salesforce Setup, navigate to:
Process Automation > Flows -
To create a new flow, click New Flow.
If you already have a suitable flow, you can open and edit it instead. -
When creating a new flow, select Start From Scratch.
-
Choose Autolaunched Flow as the flow type.
Step 4: Configure HTTP Callout in Flow Builder
In this step, you'll add an HTTP callout to your flow using the Named Credential you created earlier. This enables your flow to send requests to the Zenguard API.
Add Action to Flow Steps
- Click the "+" button after the Start element.
- Select Action from the menu.
- At the bottom, click Create HTTP Callout.
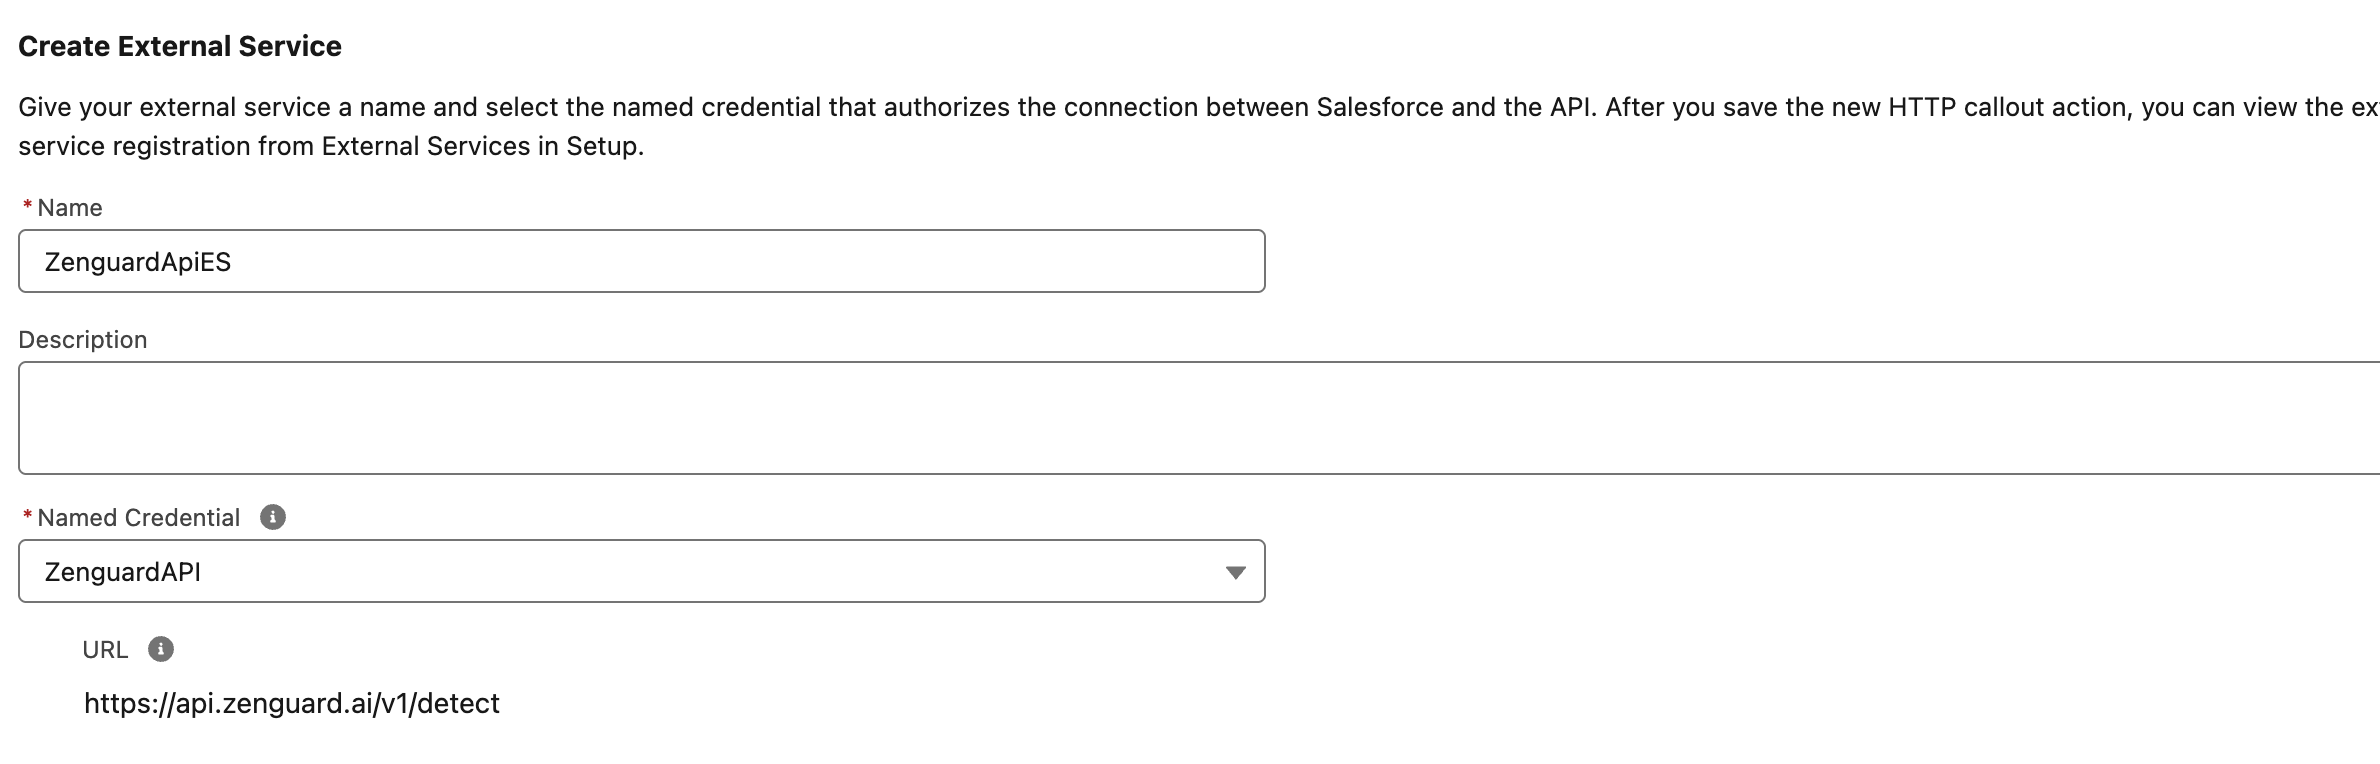
Create External Service Steps
- In the Create HTTP Callout window:
- External Service Name:
ZenguardApiES. - Named Credential: Select the Named Credential you created earlier (e.g.,
ZenguardAPI).
- External Service Name:
- Click Next.
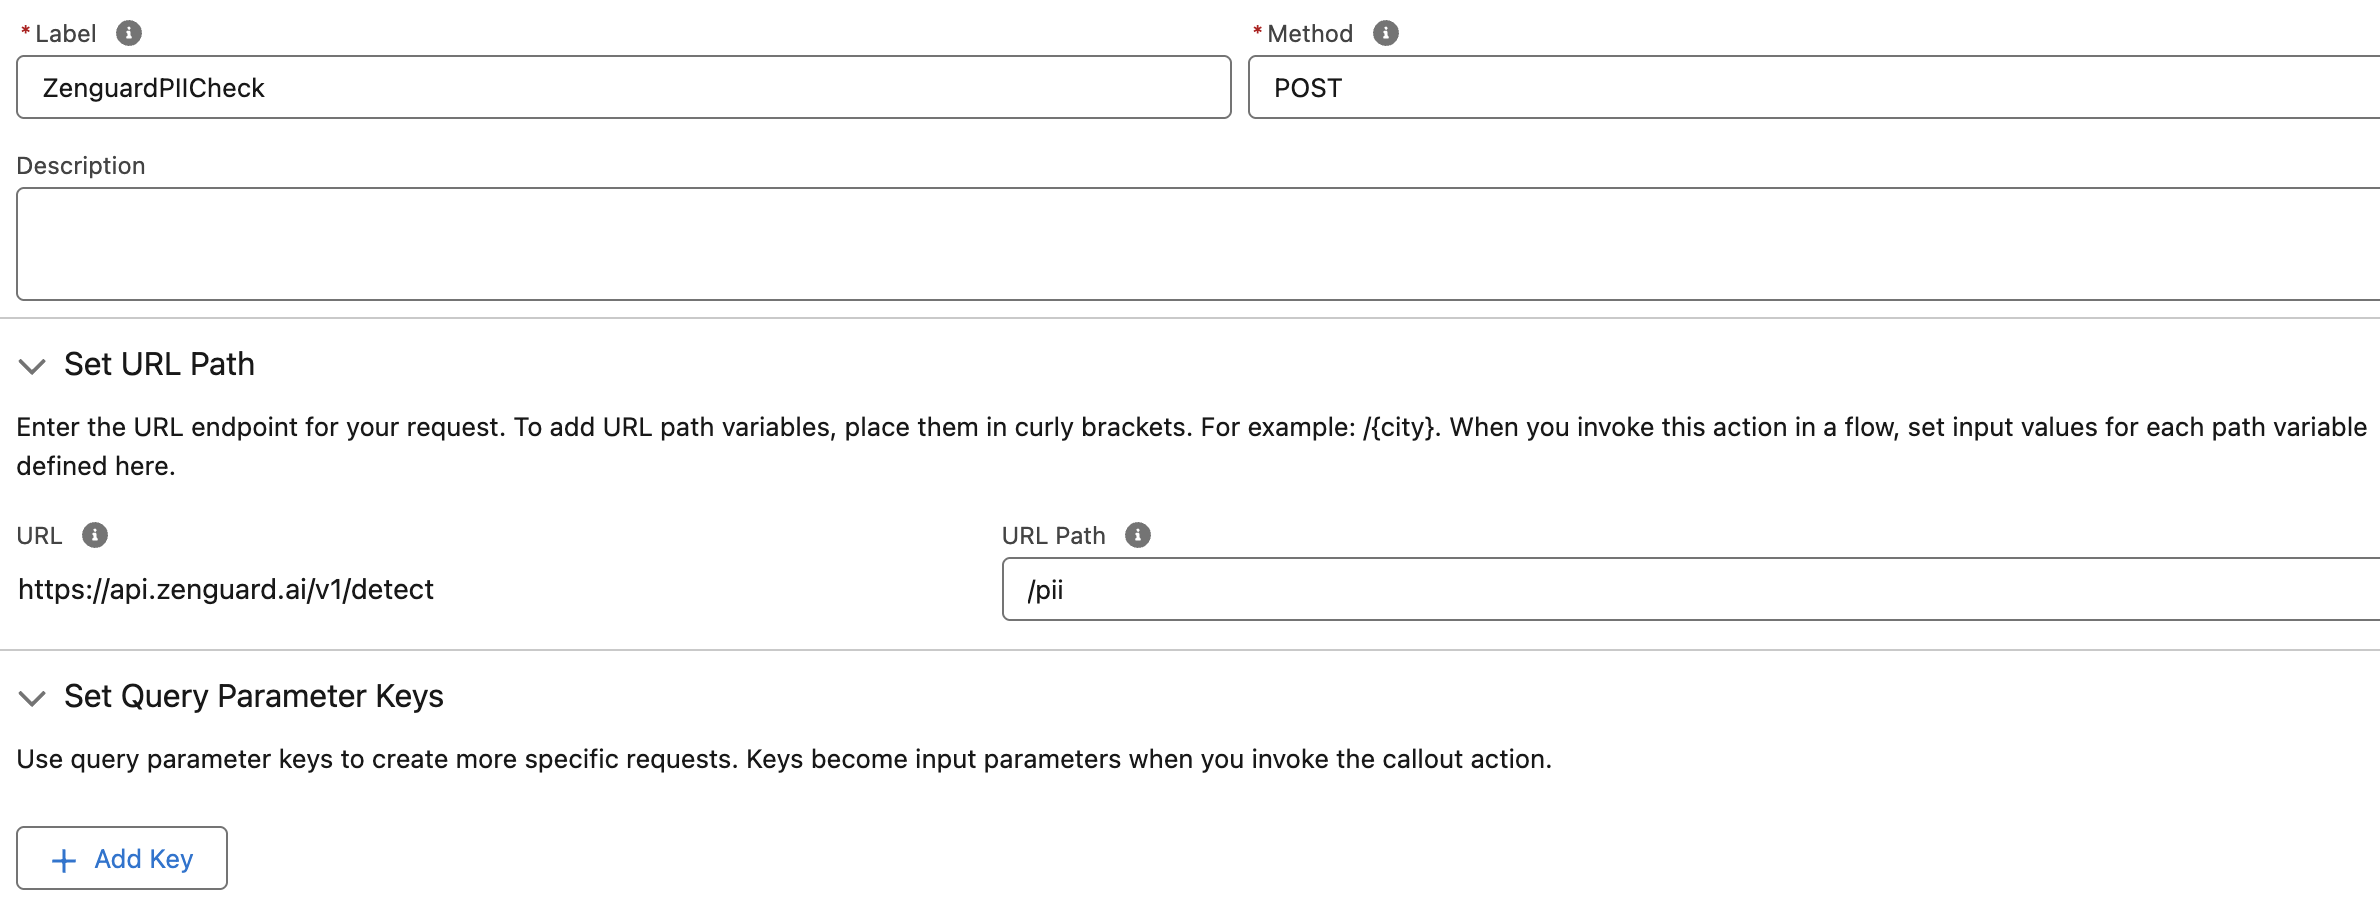
Create Invocable Action Steps
- Fill in the required fields:
- Label:
ZenguardPIICheck - Method:
POST - URL Path:
/pii(choose the appropriate Zenguard API endpoint)
- Label:
- Click Next.
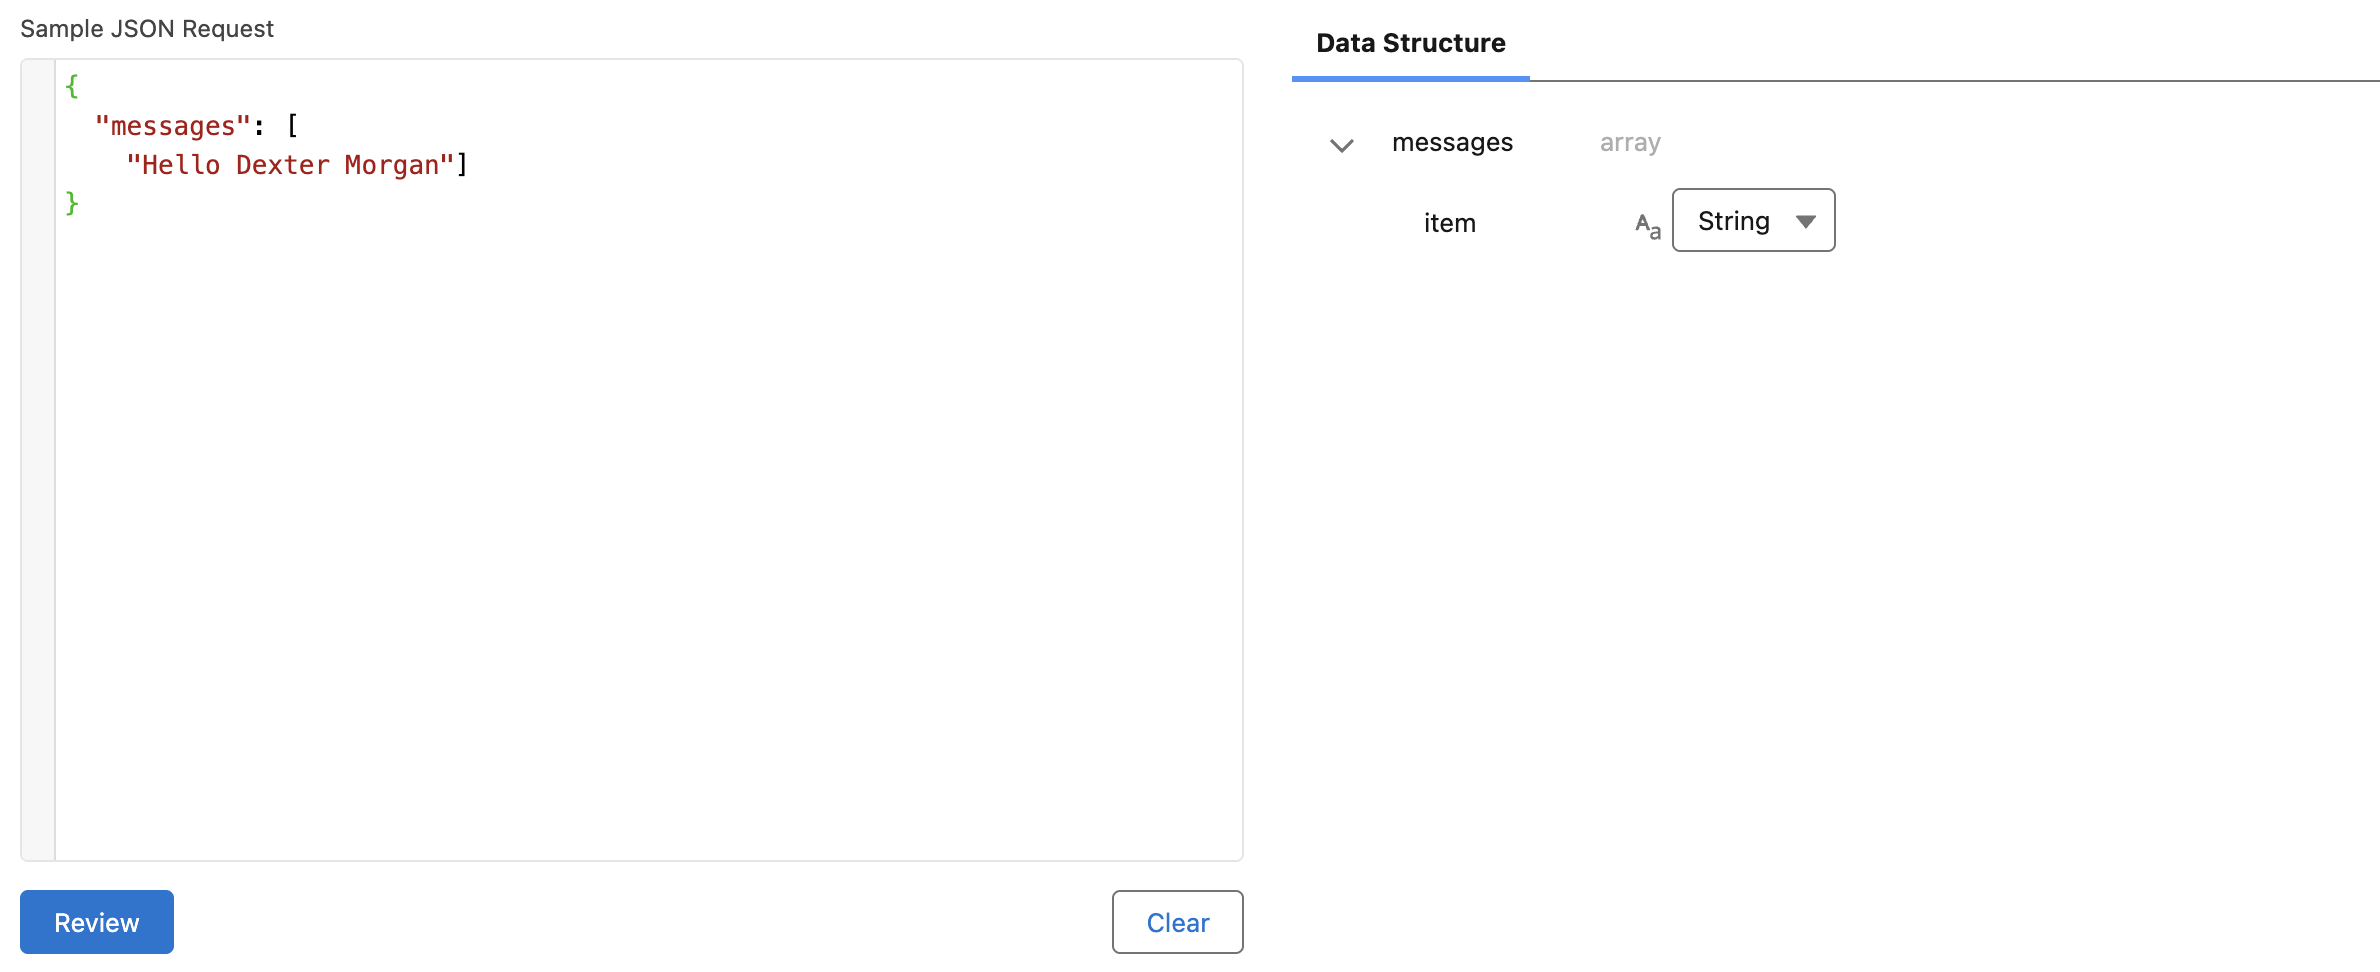
Provide example Request Body Steps
- When prompted to define the request body, choose Use Example Request.
- Paste the following example:
{
  "messages": ["Hello Dexter Morgan"]
}
- Click Review.
- Click Next.
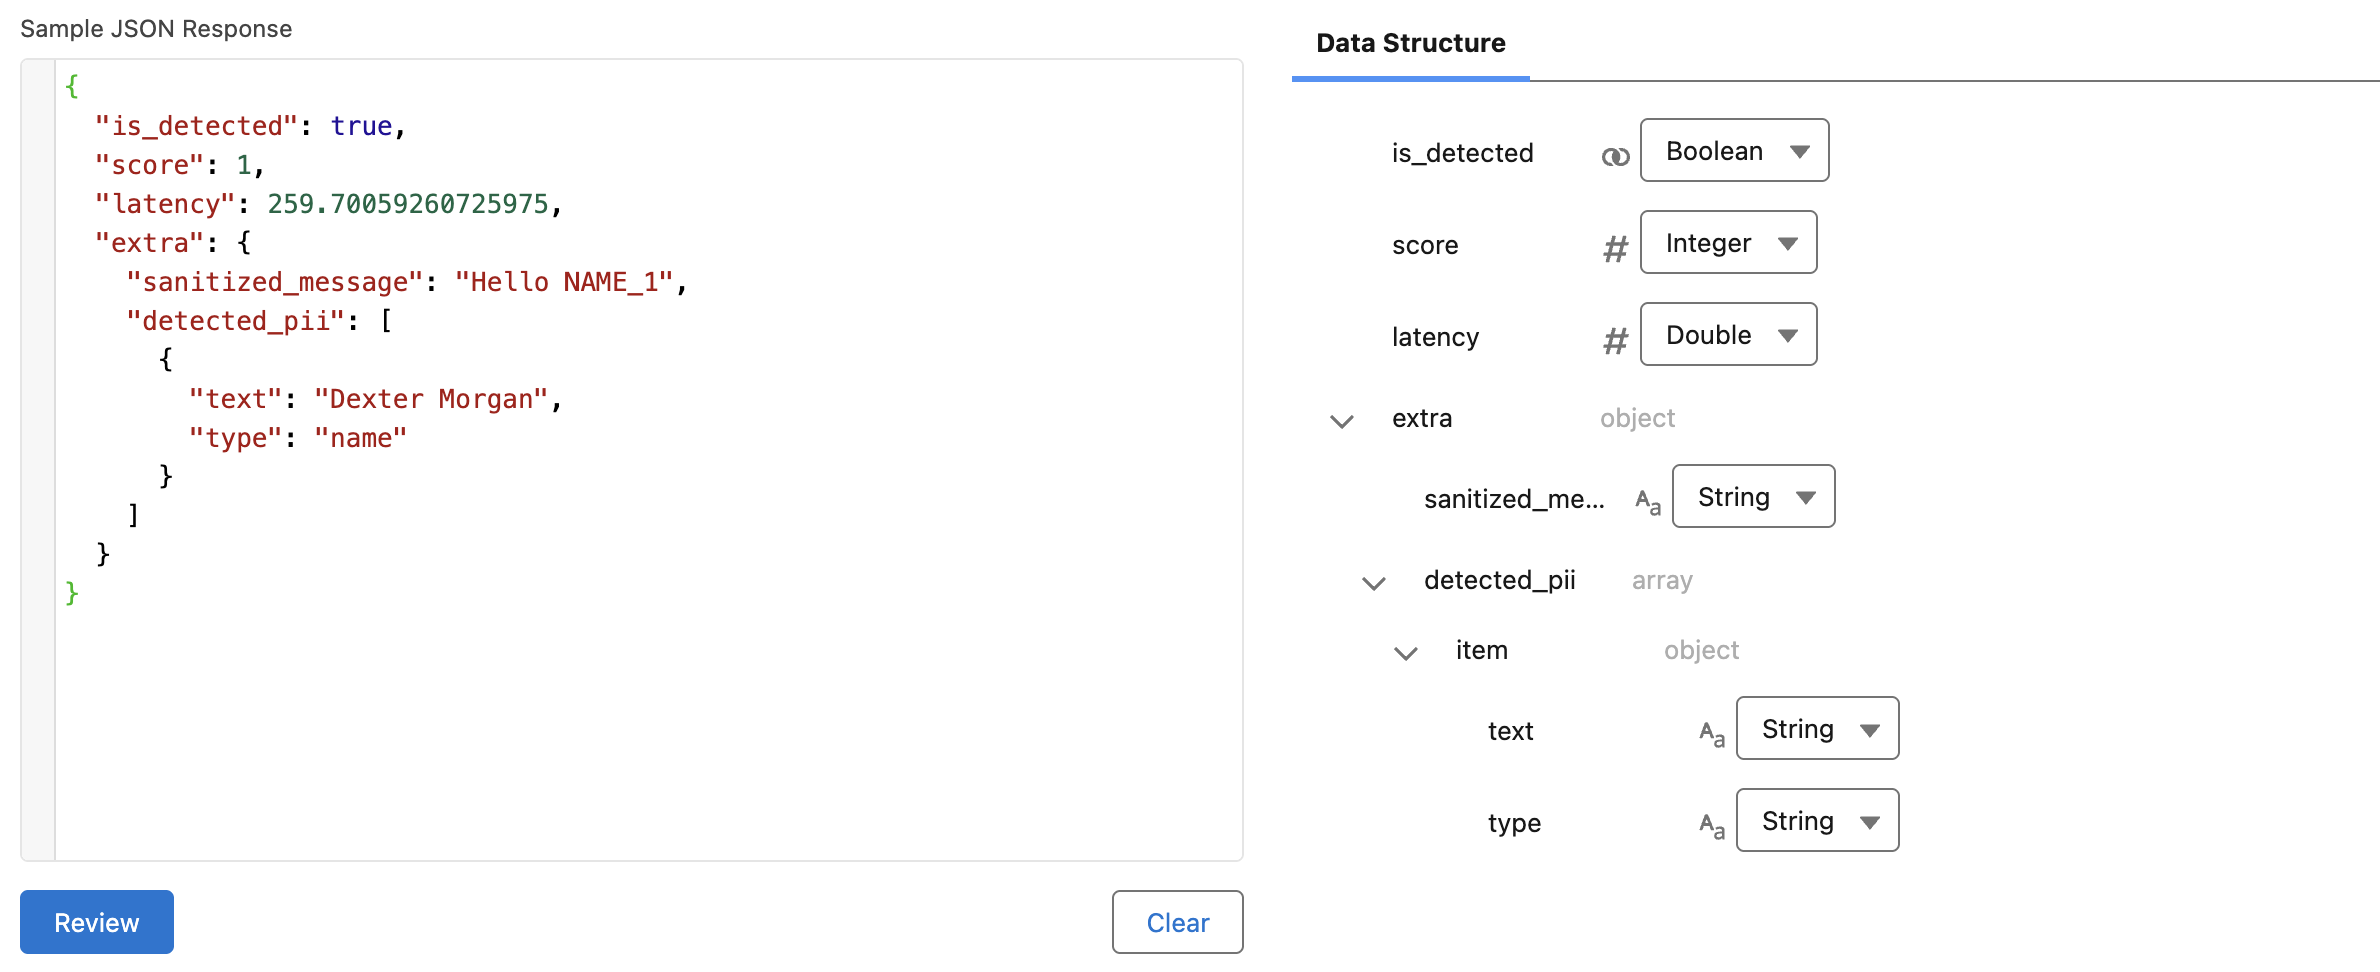
Provide example Response Body Steps
- When prompted to define the response structure, choose Use Example Response.
- Paste the following example:
{
   "is_detected": true,
   "score": 1,
   "latency": 259.70059260725975,
   "extra": {
      "sanitized_message": "Hello NAME_1",
      "detected_pii": [
         {
            "text": "Dexter Morgan",
            "type": "name"
         }
      ]
   }
}
- Click Review.
- Click Next.
Set Request Body Resource Steps
-
When prompted to define a request body resource, click + New Resource.
-
In the New Resource window, configure the following:
- API Name:
ZenguardPIIBody
- API Name:
-
Click Done.
Step 5: Add Assignment to Populate Request Variable
After setting up the flow start, you'll now assign a value to the messages field in your request body variable (ZenguardPIIBody).
Configure the Assignment Steps
-
In the Flow Builder, click the + icon before created HTTP Callout Action.
-
Select Assignment from the list of elements.
-
In the New Assignment window, configure the following:
- Label:
AssignMessages - Variable: Expand Apex-Defined Variables and select
ZenguardPIIBody.messages. - Operator: Select
Add. - Value: Choose the variable that contains the message you want to check for PII (or a variable that holds the detector input).
- Label:

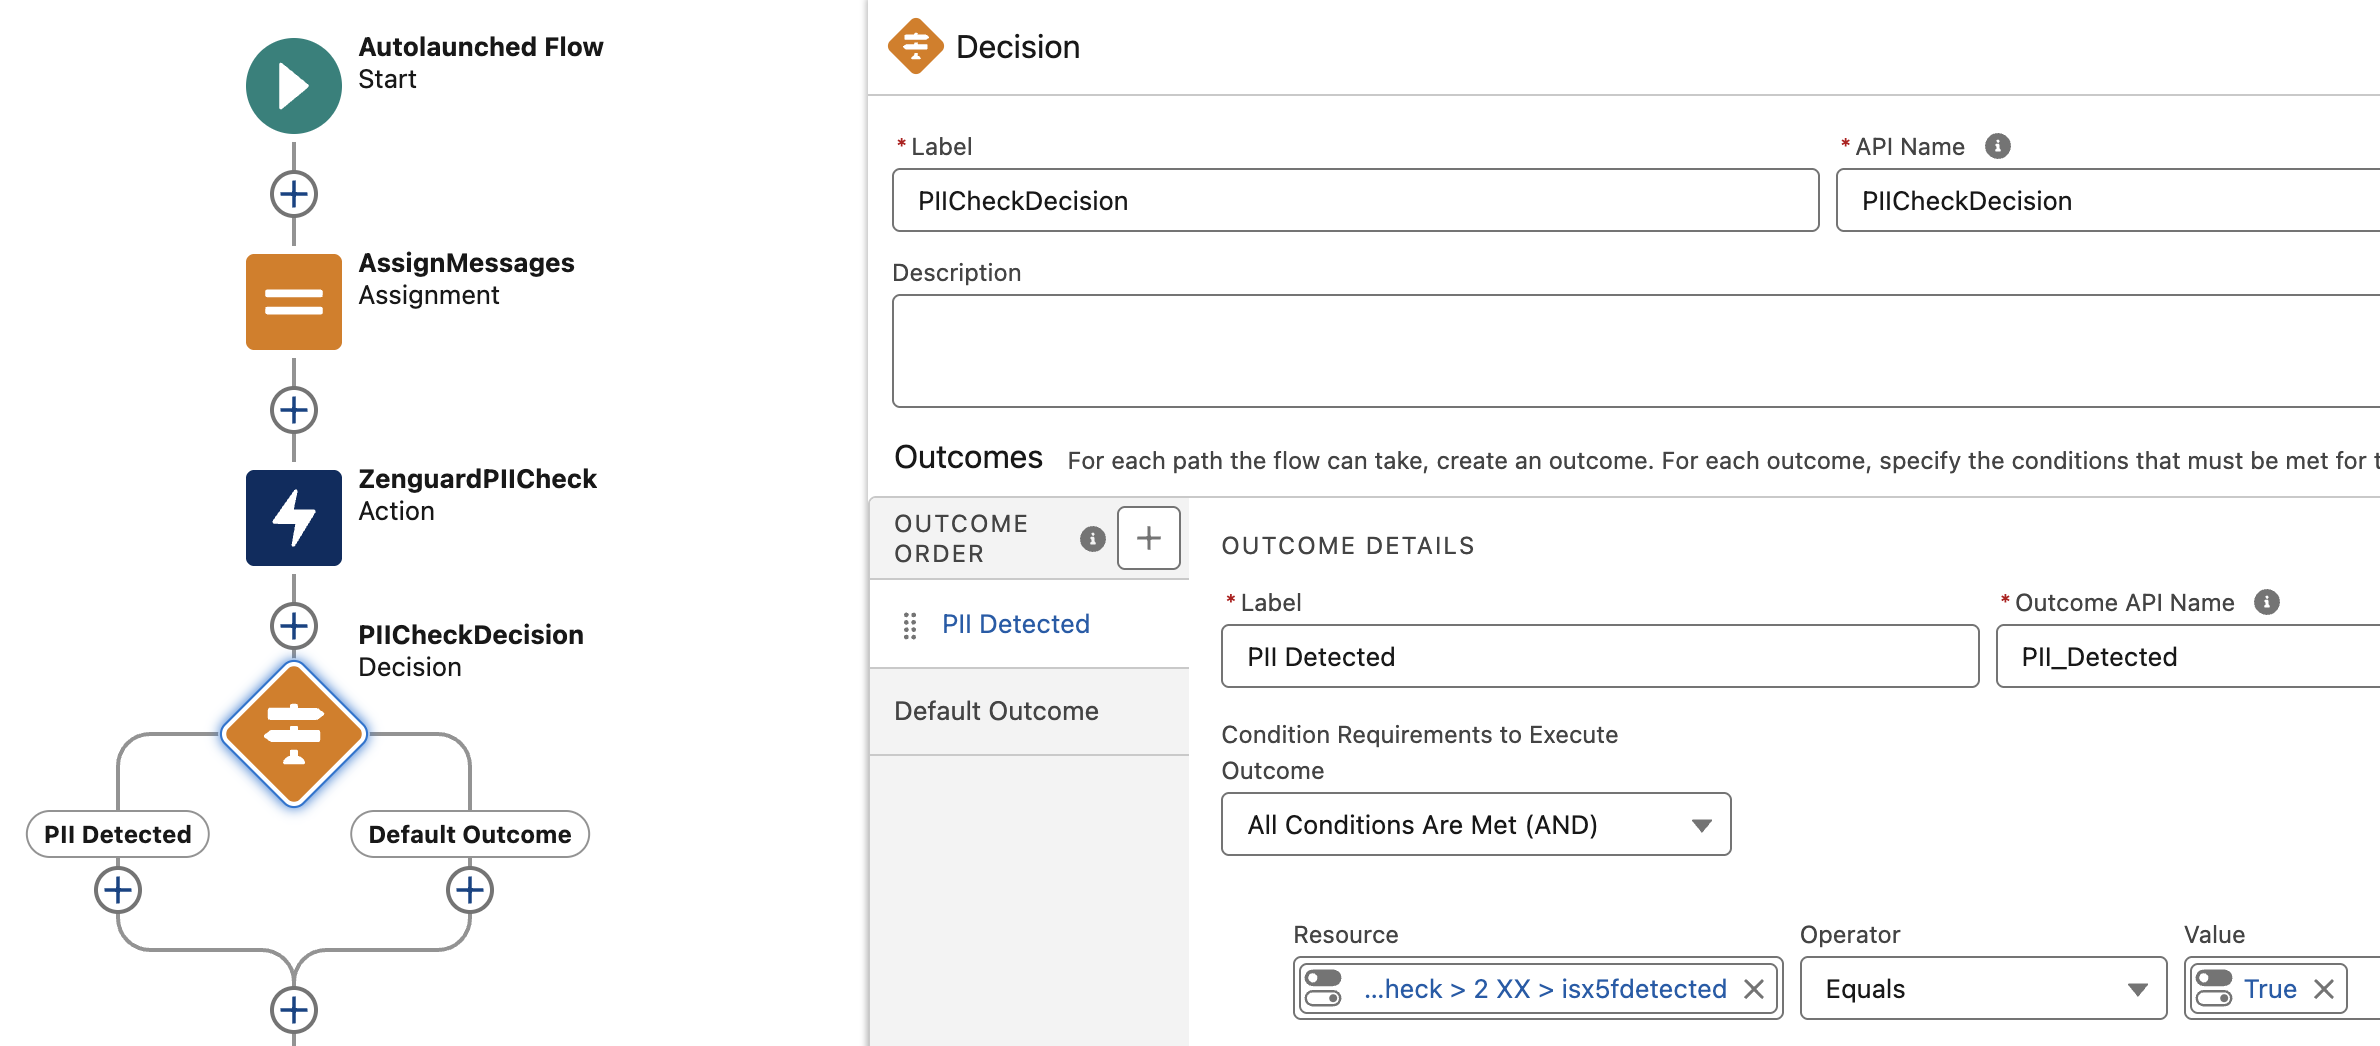
Step 6: Add Decision to Handle API Response
After the HTTP Callout Action is added to the flow, you'll need to handle the API's response. This step involves creating a Decision element to inspect the response and determine what to do next based on the result.
Configure the Decision Element Steps
-
In Flow Builder, click the + icon after your HTTP Callout Action.
-
Select Decision from the list of elements.
-
In the New Decision panel, configure the following:
- Label:
PIICheckDecision - API Name:
PIICheckDecision
- Label:
-
Fill in the fields under Outcome Details:
- Label:
PII Detected - Condition Logic: Use a condition like
Resource:ZenguardPIICheck.is_detected
Operator:Equals
Value:True
- Label:
-
You can also create additional outcomes to inspect:
- The sanitized message (e.g.,
ZenguardPIICheck.extra.sanitized_message) - Detected PII types (e.g.,
ZenguardPIICheck.extra.detected_pii)
- The sanitized message (e.g.,